ArchiveMind on macOS (Apple silicon)
Everything about installing and running ArchiveMind on a Mac with Apple silicon (M1, M2, M3, M4 …), from download to uninstall.
Before you begin
- An Apple-silicon Mac. Apple menu () → About This Mac: a line beginning Chip: Apple M1/M2/M3/M4 means this is the right page. If it says Processor: Intel, use the macOS (Intel) guide instead.
- macOS 12 (Monterey) or later.
- Disk space: the download is about 2.2 GB and unpacks to about 3.0 GB (it includes the image-understanding model, so visual search works fully offline — nothing is ever downloaded at runtime), plus whatever your catalog grows to (how much is that?).
- Memory: 8 GB is enough for everything, including People (face recognition). Measured with ArchiveMind 1.1.8, the app used about 1 to 1.5 GB while searching a real 286,000-file catalog and at most about 3.5 GB while scanning photos and finding faces, including in a 48-megapixel photo.
- No account, no internet requirement. After the download itself, installation and everything ArchiveMind does are offline.
- No Rosetta 2 needed for this build — it is compiled for Apple
silicon and runs directly; Rosetta 2 is only for running the Intel
(
x86_64) build on an Apple-silicon Mac, which you no longer have to do. See If you already installed the Intel build.
Step 1 — Download
Download link — ArchiveMind 1.1.8 for Apple silicon
ArchiveMind-1.1.8-release-macos-arm64.zip (about 2.2 GB) — checksum file: ArchiveMind-1.1.8-release-macos-arm64.zip.sha256. All downloads are listed on archivemind.app; do not download ArchiveMind from anywhere else.
Take the arm64 file, not the x86_64 one — that is the only
difference in the file names, and it is the one that matters here.
Optional — verify the download. Every release zip is published with a
matching .sha256 checksum file. Put both files in the same folder
(Downloads is fine), open Terminal, and run:
cd ~/Downloads && shasum -a 256 -c ArchiveMind-1.1.8-release-macos-arm64.zip.sha256
It must answer OK for the zip. If it does not, the download is damaged
or not the official file — delete it and download again.
Step 2 — Unpack and place the app
- Double-click the downloaded zip. You get
ArchiveMind.app. - Move
ArchiveMind.appto your Applications folder (optional, but tidy).
Step 3 — First open
Just double-click ArchiveMind.app. This build is signed with an
Apple Developer ID and notarized by Apple, so macOS opens it like any
other app — none of the workarounds older unsigned builds needed. At
most, macOS asks two one-time questions, each answered with one click:
- "ArchiveMind is an app downloaded from the Internet. Are you sure you want to open it?" — click Open. Every downloaded app gets this once, notarized or not.
- "Do you want ArchiveMind to accept incoming network connections?" — click Allow. That is ArchiveMind's own window talking to ArchiveMind on your own computer; nothing touches the internet.
The first launch also takes a few seconds longer than later ones while macOS verifies the app.
It is still not from the App Store
Notarized means Apple checked the app for malware and confirmed who signed it. It does not mean Apple reviewed the features, and ArchiveMind is distributed directly rather than through the App Store. Nothing about the app's privacy behavior changes: it still makes no network connections.
ArchiveMind then opens in its own window — no address bar, no
bookmarks — via Chrome, Edge, or Brave if one is installed. Because that
window belongs to the browser, the Dock and Command-Tab show the
browser's icon, not ArchiveMind's; the window title still says
ArchiveMind. With only Safari, it opens as a normal browser tab instead;
everything works the same. If nothing appears after ~15 seconds, go to
http://127.0.0.1:8765/ in any browser yourself.
Step 4 — First-run setup
The first screen asks where to keep your catalog (the search database), suggests a sensible default, and creates nothing until you choose:
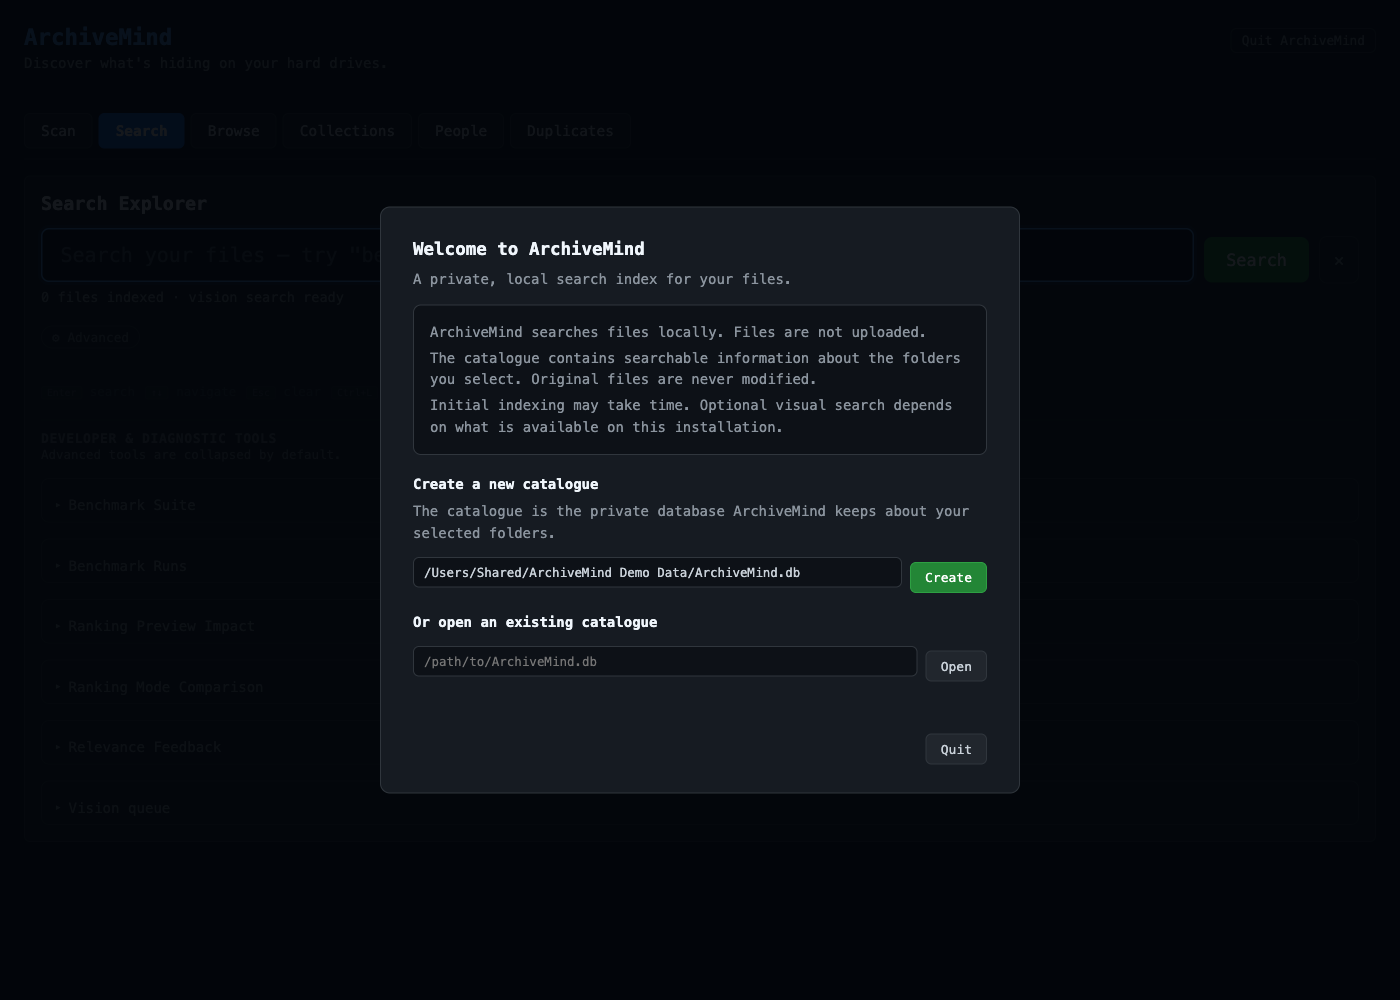
Then you pick a folder to index and click Start first scan — nothing is scanned until you start it deliberately, and you can search while the scan runs. The flow is described step by step in First launch and Adding a repository.
Step 5 — Optional preview tools
Audio waveforms, spectrograms, video frame thumbnails, and SVG previews need free command-line tools. With Homebrew, one line in Terminal:
brew install ffmpeg librsvg
Then quit and reopen ArchiveMind. Without these tools the app honestly lists those previews as unavailable — nothing breaks, and you can add them any time.
What this build contains
The Apple-silicon and Intel builds are the same application with the same features; only the processor they are compiled for differs. The Apple-silicon zip is a native arm64 build and ships the image-understanding model inside the app, so visual search works with no download and no network access.
Native, so no translation layer
Because this build is compiled for Apple silicon, macOS runs it directly rather than translating Intel instructions through Rosetta 2. No before/after performance figures have been published; what is stated here is what the build is, not a measured speed claim.
If you already installed the Intel build
The Intel (x86_64) build also runs on Apple silicon, through Apple's
Rosetta 2 translation layer — macOS offers to install Rosetta the
first time you open an Intel app, and everything works, just without
running natively. If that is where you started, you do not have to
uninstall anything special: quit ArchiveMind, replace
ArchiveMind.app with the arm64 one, and open it — running natively
rather than putting the Intel (x86_64) build through Rosetta 2 is the
reason to switch. Both macOS builds are notarized, so either opens with a
normal double-click. Your catalog and settings live outside the app and
are picked up unchanged.
Everyday use
- Start: open
ArchiveMind.app. Your catalog loads automatically; nothing needs rescanning just to search. - Close: click Quit ArchiveMind in the top-right corner of the page and confirm. Closing the window alone does not stop the app. Fallback if the page is unreachable: Activity Monitor (Applications → Utilities) → ArchiveMind → quit.
- Reveal in Finder: result cards open a Finder window with the file selected.
Where ArchiveMind keeps its data
The catalog lives where you chose during first-run setup, with a
thumbs folder of previews beside it. The packaged app follows the
standard macOS layout:
~/Library/Application Support/ArchiveMind/   config, durable state
~/Library/Caches/ArchiveMind/                regenerable caches
~/Library/Logs/ArchiveMind/                  logs
Logs useful when reporting a problem:
~/Library/Logs/ArchiveMind/archivemind.log. Your original files are
never moved or modified — ArchiveMind only reads them.
Running from source
Developers running ArchiveMind from a source checkout (not the
packaged app) get a different layout: everything under
~/.archivemind, including logs at
~/.archivemind/logs/archivemind.log. A server started from Terminal
runs in that Terminal's foreground — stop it with Ctrl-C there or
with the normal Quit ArchiveMind button.
Updating to a new version
- Quit ArchiveMind (the Quit button — not just closing the window).
- Recommended: back up your catalog first — copy the catalog's
folder (the
.dbfile plus thethumbsfolder beside it) while ArchiveMind is not running. - Replace the old
ArchiveMind.appwith the new one. - Open it. Your catalog and settings are untouched — they live outside the app — and any catalog format updates are applied automatically on first open.
Upgrading from 1.0.0
Install 1.1.8 over 1.1.7 or any earlier version in the same place (replace the app in Applications). Your catalog, settings and license carry over — there is nothing to re-import. 1.1.8 is free for everyone who bought 1.0. What changed: ArchiveMind now runs in its own window — Command-W hides it and a Dock click brings it back, Command-Q asks first when a scan is running, and no browser is involved. See the releases page.
Coming from a beta build?
The same four steps take you from a beta (0.1.0-beta.x) to 1.0.0:
install 1.0.0 over the beta in the same place. Your catalog is
kept, and your existing .amlicense license file keeps working —
there is nothing to re-import. The betas are superseded by 1.0.0; the
app now reports its version as 1.0.0.
Uninstalling
Moving ArchiveMind.app to the Trash removes the application — and
nothing else: ArchiveMind never deletes your data when the app is
removed. Left behind, deliberately, are:
- your catalog (the database file, wherever you chose to keep it,
plus the
thumbsfolder beside it) — keep these if you might ever reinstall; a reinstalled ArchiveMind picks the catalog right back up; - the app-data folders under
~/Library(Application Support/ArchiveMind,Caches/ArchiveMind,Logs/ArchiveMind).
For a complete removal, trash the app, the catalog and its thumbs
folder, and those three ~/Library folders. (If you ran an earlier
.command-based beta, it kept its data under ~/.archivemind instead.)
Your original files are untouched either way — ArchiveMind only ever
read them.